When you think about remodeling your bathroom, you have many options. Understanding how material and labor costs work together can help you choose the best bathroom remodel for your vision, budget, and timeline.
It is also important to understand the difference between a renovation and a remodel. A renovation refreshes a space, but a remodel includes construction changes like expanding, reframing, making plumbing or structural changes, and more. Contact Bathroom Remodel San Jose for professional help.
The plumbing system in your bathroom is responsible for bringing in fresh water, directing it to the sinks, toilets and showers. It also manages wastewater and prevents leaks and backflows. In short, it’s essential to the comfort and functionality of your home. During a bathroom remodel, it’s important to consider repiping as an upgrade. Repiping will help to address underlying plumbing problems and ensure that your new fixtures work correctly. It’s also a great opportunity to introduce modern technologies like touchless faucets, smart shower heads and low-flow toilets that can save you money and reduce your household water usage.
A renovation is a more cosmetic update to your bathroom, and is less expensive than a complete gut project. It can include changes such as painting, flooring and a new vanity. It’s often a good idea to do a minor renovation before you consider a larger change, as this will prevent costly mistakes down the line.
A full gut remodel is a more extensive project that involves removing everything down to the studs and rebuilding the room from scratch. This is usually the most expensive option, and will require a significant amount of demolition and construction. It can also take a longer time to complete.
When considering a full remodel, it’s important to have a clear idea of what you want from the space and how it will be used. It’s also a good idea to consider your budget before starting the project. Having a set budget will help you to avoid overspending and can be helpful in keeping your remodel on track.
A complete overhaul of your bathroom will be more expensive than a simple renovation, but it’s an excellent way to add value and improve the look of your home. It can also increase your chances of selling your home in the future, as prospective buyers will be drawn to a well-maintained and updated property. If you’re preparing for a major remodel, it’s a good idea to speak with a professional plumber before starting to get an idea of how much the project will cost and what the estimated timeline is.
Electrical
Electrical systems in bathrooms are important to consider during a remodel. The electrical system in your home is a complex network of wires and circuits that power everything from lights to outlets, appliances, and heating. The Philadelphia Electrical Code requires that bathrooms have their own dedicated circuits and are GFCI protected. This ensures that the bathroom has adequate power for safety and comfort.
A remodeling project can be as simple as rehanging the drywall and painting, or as involved as gutting the room down to its studs and rebuilding it. The type of work that you choose depends on your budget, but any remodeling project should include at least the following items:
Each bathroom should have a lighting and exhaust fan circuit, at minimum. This should be a 20-amp circuit to accommodate both the light fixture and the vent fan. If the ventilation fan has a heat lamp, a separate 20-amp circuit should be used to power that as well.
If a circuit becomes overloaded, it can trip the breaker or blow the fuse. This is to prevent overheating and potential fire hazards. It’s important to have a professional electrician estimate the electrical load and install new circuits as needed to avoid overloading.
Ground Fault Circuit Interrupter (GFCI) outlets are required in bathrooms and other wet areas to prevent electric shock. This type of outlet protects against electric shock by shutting off the current when it senses that there is a risk of water getting into an outlet or switch.
Whether you’re doing a full bathroom remodel or a minimal renovation, it’s important to hire a licensed and experienced contractor for any electrical or plumbing work. These contractors are trained to follow proper safety guidelines and can ensure that your remodel is up to code.
Be sure to ask your contractor about lead safety, especially if you have children or pregnant women living in the home. Homes built before 1979 may contain lead paint, which can cause serious health problems. It is important to test for and treat lead paint, even if the paint is peeling or flaking.
Design
If you’re thinking about remodeling your bathroom, you need to decide what you want the outcome to be. Start by looking at your family’s lifestyle and examining their needs. Is it important to have a functional space that is easy to keep clean, or do you want a luxurious spa-like experience? It’s also a good idea to consider what your neighbors and potential buyers might like. Look at trend studies, websites like Houzz, and talk to your friends and neighbors to learn what sells in your area.
A remodel is a more extensive project than a renovation and usually involves changes to layout, design, and aesthetics. This may include moving or removing walls, adding or removing storage spaces, and updating plumbing and electrical systems. It can also involve changing the style of fixtures and accessories. It’s important to find a professional contractor to help you create your new space.
Once you’ve settled on a design, the next step is to finalize the details. This will typically include reviewing sketches, floor plans, and CAD drawings of your space. This will ensure that your design is exactly what you want it to be. It’s also a good idea to set aside 5-10% of your budget for contingencies. There are bound to be unforeseen expenses during the construction process, so it’s important to have a cushion in case things don’t go as planned.
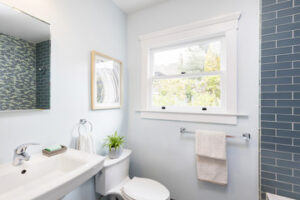
The design of your bathroom is one of the most important factors in a successful remodeling project. You’ll need to take into account the amount of natural light your bathroom receives, its size, and your preferences. You’ll also need to consider the materials you’re using, such as tile, countertops, paint, and cabinetry.
To make sure your bathroom looks amazing, you should choose a color scheme that fits the overall style of the room. You can use a neutral palette to create a modern look or opt for a more colorful theme. Make sure to choose quality materials, such as granite or quartz countertops, and high-quality fixtures, including faucets and showerheads. If you’re unsure where to begin, consult with a professional bathroom designer. They can help you create a beautiful and functional space that will increase your home’s value.
Budget
A remodeling project can be as affordable or luxurious as you want it to be, but it all starts with a realistic budget. To help you determine how much to budget for a bathroom remodel, begin by evaluating your priorities for the space. Consider what you want your finished bathroom to look like and identify which elements are non-negotiable. This will help you calculate what you can spend on upgrades like his and hers sinks or an imported marble countertop.
A basic bathroom remodel focuses on refreshing existing features rather than replacing them entirely. This type of renovation is typically less expensive than a full remodel because it doesn’t involve moving plumbing fixtures or changing the square footage of the room. However, it can still cost a significant amount of money depending on the scope of work and materials chosen.
The average cost of a basic bathroom remodel is about $5,000, but it can vary widely from $500 to $15,000. A large part of the difference in costs is due to the type and quality of fixtures and finishes selected. For example, a high-end vanity may cost more than a basic model but will likely be better quality and last longer. In addition, new features such as a walk-in tub can increase the cost of a remodel by up to $10,000, depending on the model and accessories chosen.
It’s also important to keep in mind the additional expenses that come with a bathroom remodel, such as the cost of demolition, new construction, plumbing and electrical work. It’s helpful to compare the prices of different contractors before hiring one, as this can help you save money by getting the best deal on the services you need. Additionally, shopping around for appliances and fixtures can help you find more affordable options without sacrificing quality or functionality.
While a complete bathroom remodel is usually more expensive than a basic renovation, it can add substantial value to your home. To maximize your return on investment, focus on making smart choices that reflect current design trends and your personal style. For example, a modern free-standing tub can make your bathroom feel more spacious and luxurious but will still be affordable when compared to the price of a walk-in shower.
